As the title says, here is how it turned out. Help from friends and family made this possible. Thanks to Brandon, Eb, my folks, and Eric. Without you guys it would not have turned out anywhere near this nice. Now it's time for some trim.
Saturday, December 6, 2008
Great Room Fireplace Part 3--Finished Product
As the title says, here is how it turned out. Help from friends and family made this possible. Thanks to Brandon, Eb, my folks, and Eric. Without you guys it would not have turned out anywhere near this nice. Now it's time for some trim.
Great Room Fireplace Part 2
With the fireplace in and functional, it was time to put up the rock. I was planning on doing it myself until I found out that a buddy of mine from High School was also looking for work. Eric and I used to party together in High School and since we last bumped in to one another, has gone on to become a Master Mason. Having worked steadily in the Yellowstone Club near Big Sky, Montana, his experience in the masonry field and his availability made this an easy decision to make. It did cost me some whiskey.....
 Sorting the rock into simmilar shaped pieces. What a mess.
 Masking the fireplace.
 Emily spraying the backerboard with water to help with adhesion.
 Eric sets the first stone.

 Eric designed an arch to match the front of the fireplace. Had to cut a stone to make the "Keystone". The soldiers that stand on either side took very little work.
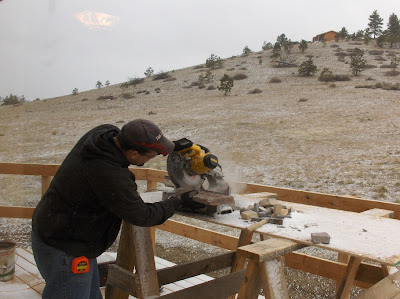
 Setting up for a cut. Eric marks the stone, I cut it. Judging by the saw angle this one that Eric asked me to "Knife edge" to help hide the cut.
 The saw is my 10" dewalt compound miter chop saw. It has done everything from cutting decking in Absarokee, cutting rafter boards in Nevada, Cutting wall boards in Alaska, rebar on the foundation, and now cutting stone for the fireplace.
 Eric cleaning up and tooling the joints on the low stuff. Ready to go up.
 Setting up a platform for the work up high.
 Eric laughing at my diamond saw antics, another stone toasted....
 It started snowing, so that made cutting the stone's that much more fun.


 Eric is smiling, cause this is the last stone.
 Done!! Now time for cleanup.
 Tooling the joints (scraping away excess mud) and cleaning mud off of other stones.
 Putting away tools and cleaning up the mess we have made.

 Sorting the rock into simmilar shaped pieces. What a mess.
  Masking the fireplace.
  Emily spraying the backerboard with water to help with adhesion.
  Eric sets the first stone.
 Eric designed an arch to match the front of the fireplace. Had to cut a stone to make the "Keystone". The soldiers that stand on either side took very little work.
  Setting up for a cut. Eric marks the stone, I cut it. Judging by the saw angle this one that Eric asked me to "Knife edge" to help hide the cut.
  The saw is my 10" dewalt compound miter chop saw. It has done everything from cutting decking in Absarokee, cutting rafter boards in Nevada, Cutting wall boards in Alaska, rebar on the foundation, and now cutting stone for the fireplace.
 Eric cleaning up and tooling the joints on the low stuff. Ready to go up.
  Setting up a platform for the work up high.
  Eric laughing at my diamond saw antics, another stone toasted....
 It started snowing, so that made cutting the stone's that much more fun.


 Eric is smiling, cause this is the last stone.
  Done!! Now time for cleanup.
  Tooling the joints (scraping away excess mud) and cleaning mud off of other stones.
  Putting away tools and cleaning up the mess we have made.
Great Room Fireplace Part 1
After basking in the glow of the finish in September, it was time to get back to work. Things were not progressing real fast with hunting season in full swing but things were to change. In early November, all 570 employees of the East Boulder Mine were cut loose. This meant I had lots more time on my hands. During the first week I spent a lot of time hunting but reality soon set in. If I did not receive a call back I would need to have things ready to sell.
While I was in Billings I picked up all of the supplies we needed to install and finish the Great Room Fireplace and set out to get it done. The fireplace is made by Vermont Castings, and it sells new for around $4000 without the fancy Roman Bronze Arch front cover, which is another $1200. This was a floor model and the company had discontinued the model so we got it for about $2900. The venting supplies cost another $400 and I think I spent another $50 or $60 on propane piping. The stone came from a company in town called All Stone. 53 total square feet of multi-colored cobble stone, mason mix, and lath cost us another $370. All together it was a considerable expense for us considering the employment situation but if we needed to sell the house, it had to be done.
Once we got the material home I started by building the platform inside the fireplace enclosure and setting the stove in place. Kevin Eberle came over one day and helped me run the propane piping and then Brandon came over on Thanksgiving and helped me install the chimney venting. Once that was complete the fireplace was functional. Time for the rock!


The stove is actually running in this picture.

Tuesday, September 23, 2008
DONE!!! Done enough that is.
A house is never really done. It will get done enough. In the words of the appraiser, "A house is never really done until the day you move out." Sounds like the truth to me.
The last three weeks have been a marathon so now we are taking a break. As you can see it turned out pretty good.


The last three weeks have been a marathon so now we are taking a break. As you can see it turned out pretty good.


Finishing Details
We're on the home stretch. Appraiser was coming Monday so we were pushing hard on trim, closet shelves, minor landscaping, and lots and lots of cleanup. Here's some pics that we happened to get before the work was all done.


Kelly's Pantry Shelf Project
Kelly once again show's that she has way more talent than she gives herself credit for. She designed and built the shelving layout in the pantry in one night. This is quite the feat once you realize that she built them out of the ceiling board scraps. Each shelf is two ceiling boards that have had the tongue end ripped off of one, and the groove end ripped off of the other. Each edge was then routered, cut to length, and then mitered to match the other shelf in the corner. They turned out really nice. Lots of storage and it looks great too. Good job baby.


Subscribe to:
Comments (Atom)