Friday, August 29, 2008

Carpet Done

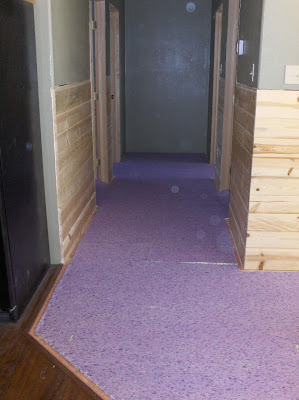
What a treat!! The color goes really well with the green drywall, logs, and the T&G. The girls love it. It feels like we have a home finally. I've not had a sliver in my foot for a week. I can't believe it. Ollin and his crew did a great job. It's too bad that the carpet that was ordered wasn't quite enough to finish. The stairs, the master closet, and a small part of Isabella's bedroom still need to be finished so we'll see the boys again.


Carpet Pictures Part 4


Carpet Pictures Part 3


Carpet Pictures Part 2


While I'm Away--Carpet Part 1

The running joke is that Kelly does it all while I'm at work. I am going to have a hard time disputing it after you see what happened to the house while I was in Oregon (it wasn't a vacation!!). Kelly arranged to have the carpet installed while I was gone. And it turned out AWESOME!! Her eye for color is amazing. Here's the first batch of pictures. The purple is the thick pad going down.


Kelly's Drywall

Kelly keeps saying she hates drywall. Doesn't look to hard to me. That's easy to say since I haven't touched the stuff. (I'm gonna pay for that) She has finished almost all of the drywall and I'm happy to report that it looks awesome. She had to invent a way to finish the 45 degree corners. Most people will just mud the corners but you will end up with a line that is far from straight. Kelly is making her own steel corner bead by bending a standard 90 degree corner bead. If you don't get it bent just right it will take lots of mud to make the wall look right. One of the walls has 8 or 9 coats of mud on it, which really helps display how committed she is to making this place right. Thanks baby.


Good Friends=Great Help--Stairway and Ceiling

You only get to have a few true friends in your life and I have had the great fortune of having Vince as a friend. He and I met in Nevada and have been raising hell together ever since. He is one hell of a hand. he showed up Last Saturday and helped me knock out the rest of the ceiling in the great room, frame the back of the fireplace, and install the T&G in the stairway. I won't lie, there was a lot of beer consumed, but the job turned out great. Thanks Vince.


And none of it would have been possible if Noel didn't give Vince the permission to hang out with trouble like me. And she showed up too to help Kelly. I think she likes to spend time with the girls too. Thanks Noel.

Finishing Fireplace--Butch's Wainscoating

I gave Butch a quick idea of what I would like to see on the fireplace and he made it happen. If you look closely, he mitered each angle and shimmed it perfectly, and kept the grain aligned too. You can follow it all the way around the fireplace. He is a genius with wood. I couldn't make this happen without him. Thanks Butch.


Wednesday, August 13, 2008

Fireplace Sheeting

Here's how the fireplace ended up looking after a hard days work. Notice the inset bookcase on the near side. We have since made it longer so it better matches the proportions of the fireplace, and it will end up being a very nice touch.

Framing the Fireplace

After finishing up with the chimney we moved on to more interesting work. Truely this could be called Butch's Fireplace since he did all the hard work. The compound angles on the 45 degree sides and celing joints were enough to make my feeble mind hurt. He managed to work it out very well and the finished product will show it.

First had to frame the front lower portions with the right sized opening for the fireplace. Then we started on the upper portions of the walls. Here Butch is holding the first of the upper walls in place, wishing I would grab the nail gun instead of the camera.

Me working on the ceiling, wishing it was beer:30.....or is it? Looks like there is an open on there.
Butch and I working on the ceiling. One last run of boards till we can finish up the rest of the fireplace walls.
Framing done! Time to roll up the hoses and put on some cement board and sheet rock.

Framing in the Chimney

We've come a long way from where this first picture shows things.

I was busy lining up the triple wall chimney pipe with the spot in the roof that I wanted to go through. Since then I finished the chimney install and flashing on the roof. But with the insulation now installed I had to finish everything the right way, and that includes a non-flammable walboard enclosure and steel fire stop. Pictures are below.

In addition to the non-flammable enclosure, the flashing has vent holes to let heat escape and I added another layer of protection. I encased the triple wall in another piece of 12" sheet metal pipe.

After that was done, I installed the steel fire stop and sealed everything up with insulation, foam, and silicone sealant. She's air-tight now.

Now it's time to finish the ceiling around it and frame up the new fireplace enclosure.

Monday, August 4, 2008

Kitchen Done

Here's a look at the semi-finished product. No trim yet but it still looks pretty sharp. We can't wait to be done.