This blog is intended to document the construction of the Walton's log home in Montana. Construction has been underway since December of 2007 and is expected to be complete by Spring of 2009. The background picture shown here was taken from the build site.
I am blessed to have a neighbor like David. He has been awesome. He came down and helped me install and tie rebar so that I could be ready for concrete in the morning. I was trying to take advantage of another one of those "weather windows" that I mentioned earlier and had lined up the flat work crew and the concrete pump already. Needless to say I would not have been ready if it wasn't for David. I finished tying wire around 11pm in the headlights of the truck. I still needed to form up the front wall and set grade stakes but I was done for the night.
Once again the weather was not our friend. I shoveled till I couldn't shovel and then we started using the skidsteer to pull the frost blankets, full of snow, out of the foundation. It's very important to not let a bunch of moisture in where you plan on pouring concrete so we were really carefull. Then it was time to install the gravel. While Mark was hauling gravel, Bernie was installing it. I was plumbing the basement waste piping. After all that it was time for rebar.
TO finish up the install we had to set the transformer, set the 400amp service pedestal, complete the terminations, and then dress the roadway. Once again the Kelly boys made quick work of the roadway. We can now take off with our temporary power feed. That should make framing much easier.
With the weather turning on us we went to doing something that could be done during the cold weather. I used a bit of my experience from Alaska to get Bernie's Skidsteer up a running. A propane heater and frost blanket along with the generator helped bring the machine to life. Then it was on to the excavator so that Bernie could dig the electrical trench. Beartooth Electric showed up and we installed the 10kv electrical cable for the 7200 volt primary feed. We then got the transformer off the truck and buried the cable out to the high voltage box at the road.
Back to the land after a 7 day break. Before the Kelly boys could get back after I had to coat the outside of the forms with a waterproofing coating so I got up early and took the wife out for a day of it. We managed to get it all done in a matter of a few hours. Mark and Bernie showed up and backfilled the walls. It's a real treat to watch these two work.
This was probably the most uneventfull pour that I have ever been on. We poured the two 8' sections first so that the bottoms of them would set up and we could hopefully avoid the dreaded "blowout". The ICF forms were so sturdy that not only did they hold up to the pressure, we didn't use any bracing except for where we needed to straighten a wall. Once we got the walls poured we had to break out the frost blankets and cover them all up again. I can't wait to be done with these damn things.
I was wrong with my estimate on time remaining to be ready. We had a "weather window" which is not very common this time of year so we got up really early and finished the job out and before we knew it the mud was there. We built a little bridge so that we could walk in and out of the excavation without messing up the forms and that was a very convienent addition.
Remember those details I mentioned...yeah. Details happen. We realized that in order to make the minimum requirements for an egress window we would have to install a "window buck" for the back bedroom. Once we figured out the dimensions we cut the 2x6's to fit and then cut out the bottom so that we could pour right through it. Then it was on to finishing up the forms. We didn't quite get there. About 1/2 a day left to be ready for mud.
Day three started out up top. We made quick progress with the majority of the work got done on the 76' long back wall. My wife was a huge help and I could not have finished that wall so quickly without her help. About a day of forming left and then another day of details like the interface between the forms and the trench banks.
Day two--We finished up the forms in the trench. Part of that effort is getting all of the steel in the forms and tied to the verticals. Doing this and maintaining everything square and on your chalk lines can be tricky but if you have a little patience and a good level it will happen. To cut the rebar we used an abrasive blade on my Dewalt Chop saw. It works the generator pretty good but it cuts steel very well. A couple more days and we'll have the walls all formed up.
With the footings complete and cured we picked today to start on the insulated concrete forms for the walls. The forms were purchased from Stuart ???? who lives in Bozeman. Stuart runs a business that is an authorized distributor for EcoBlock forms (www.ecoblock.com). The forms go together very easily with very little waste. The clips have builty in grooves for #4 rebar and are suprisingly sturdy. I am very impressed and would reccomend this system to anyone.
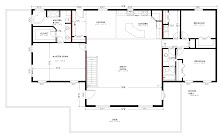
The log home we are building is the Grand Montana (package from Paramount Log Homes) on a full basement. Approximately 5200sq' when finished, will feature an open floor plan with 5 bedrooms, 3 bathrooms, 2 fireplaces, tongue and groove pine/cedar interior, and windows to highlight the views of two mountain ranges (Beartooth & Prior Ranges) and the Yellowstone River.
Construction will incorporate "green" features such as insulated concrete forms, natural wood trim, high effeciency HVAC system, passive solar heating, and many of the accent pieces will come directly from the logs on the property.